Master Latte Art: Advanced Tulip and Rosetta for Home Baristas
Pouring a flawless rosetta or a layered tulip at home feels like a milestone. You have mastered the basics of contrast and flow, but the advanced techniques that separate a decent pour from a stunning one require a deeper understanding of milk dynamics, pitcher control, and canvas preparation. This guide is designed for the home barista who already pours consistent hearts and wants to push into competition-level patterns without leaving the kitchen counter. We will dissect the specific mechanics behind the tulip and rosetta, troubleshoot common failures, and show you how to practice deliberately with the equipment you already own.
The Foundation of Advanced Latte Art: Microfoam and Canvas Readiness
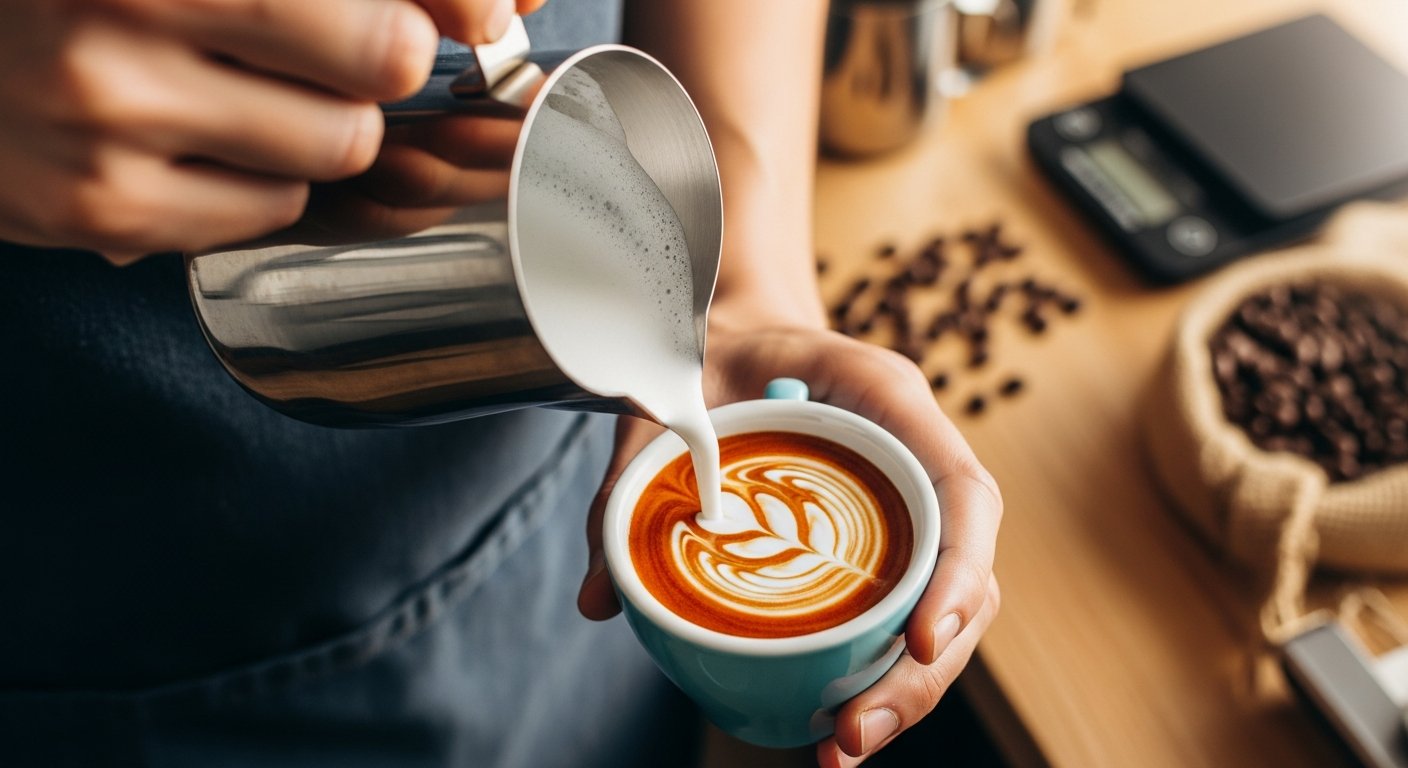
Before attempting layered or etched designs, your milk texture must be flawless. Advanced latte art demands microfoam that is dense enough to hold shape but fluid enough to spread. If your milk is too thin, the layers will blur into the crema. If it is too stiff, the pour will blob and refuse to travel. The ideal texture for a tulip or rosetta is wet paint: it should coat the back of a spoon without dripping quickly, yet pour like heavy cream.
Equally critical is the espresso base. Crema that is thick, reddish-brown, and persistent provides the contrasting canvas. If your crema is pale or thin, the art will lack definition. For a home setup, pull a double shot into a preheated cup that is slightly tapered at the bottom. This shape funnels the milk flow upward and helps layers stack. The cup should be filled only one-third full with espresso before you begin the pour. This gives you room to build height and control the flow rate.
If you are still refining your milk steaming technique, revisit our guide on Espresso Milk Frothing Techniques for Latte Art Beginners to ensure your microfoam foundation is solid. Even advanced baristas benefit from revisiting the basics of aeration time and temperature.
Advanced Tulip Technique: Layering with Precision
The tulip is a pattern built on concentric, overlapping layers that form a flower-like shape. Unlike the rosetta, which relies on continuous wiggling, the tulip uses a series of distinct pours that stack upon each other. The advanced version introduces multiple layers with decreasing width and a sharp final cut-through.
Step 1: The Initial Drop and Base Layer
Hold your pitcher close to the surface of the espresso, about 1 cm above the crema. Pour a steady, narrow stream directly into the center of the cup. As the cup fills to about half capacity, the milk will begin to form a white disk. Without stopping, lift the pitcher slightly (to about 3 cm above the surface) and pour a second stream directly into the center of the white disk. This second pour will push the first layer outward, creating a ring. Repeat this lifting and pouring motion three to four times, each time pouring into the center of the previous ring. Each layer should be slightly smaller than the last, creating a stacked effect.
Step 2: The Final Cut-Through
Once you have stacked three to four rings, lower the pitcher back to 1 cm above the surface. Pour a steady stream through the center of the stacked layers from back to front. This cut-through will divide the stacked rings in half and form the signature tulip petal shape. The key is to maintain a consistent flow rate: too fast and the design washes out, too slow and the cut-through will be jagged. Practice this motion with water in a dark mug to build muscle memory.
Troubleshooting Common Tulip Issues
- Layers merging together: Your milk is too thin, or you are pouring too fast. Slow down and ensure each layer is fully formed before the next pour.
- No distinct rings: You are lifting the pitcher too high, causing the milk to sink instead of pushing outward. Keep the spout close to the surface for each layer.
- Cut-through creates a blob instead of a clean line: Your flow rate is inconsistent. Use a steady, medium stream and keep the pitcher spout centered.
After mastering the basic stacked tulip, experiment with variations such as the reverse tulip (starting wide and narrowing inward) or the multi-tiered tulip with five or more layers. These require precise control of pour speed and pitcher height but yield dramatic results.
Advanced Rosetta Technique: Wiggling, Feathering, and Etching
The rosetta is the most recognizable latte art pattern, and mastering it at an advanced level means achieving crisp leaf veins, a symmetrical shape, and a fine stem. The advanced rosetta goes beyond simple wiggling: it incorporates controlled spacing, variable amplitude, and optional etching for extra detail.
Step 1: The Base and Wiggle
Start with the pitcher spout very close to the surface, about 0.5 cm above the crema. Pour a steady stream while simultaneously wiggling the pitcher from side to side at a consistent frequency. The amplitude of the wiggle should be about 1 cm. As the milk forms a fan shape, gradually move the pitcher backward toward the far rim of the cup. The key is to keep the wiggle frequency constant while the amplitude naturally decreases as you move backward. This creates the tapered leaf shape.
Step 2: The Stem and Feathering
When you reach the far rim of the cup, stop wiggling and lift the pitcher to about 3 cm above the surface. Pour a thin, steady stream straight through the center of the design from back to front. This creates the stem. For a more advanced look, you can feather the stem by slightly pulsing the pour as you move forward, creating a dashed line that mimics a leaf vein. This technique is known as a feathered rosetta and requires a very controlled, intermittent flow.
Step 3: Etching for Detail
For competition-level precision, use a fine etching tool (a toothpick or a dedicated latte art pen) to add secondary veins or adjust symmetry. After pouring the stem, gently drag the tool from the outer edge of the leaf toward the center at evenly spaced intervals. This adds definition and can correct minor asymmetry. Etching works best when the crema is thick and the milk is still fluid but not set.
Advanced home baristas should practice the rosetta with different cup sizes and shapes. A wider bowl allows for a larger leaf with more wiggle passes, while a narrow cup forces tighter spacing. Each requires adjustment of your pour speed and wiggle amplitude.
Combining Tulip and Rosetta: The Mixed Pattern
Once you are comfortable with both patterns individually, try combining them to create a tulip-rosetta hybrid. This advanced technique involves pouring a stacked tulip base (three rings) and then finishing with a rosetta wiggle on top of the final layer. The result is a design that has the layered depth of a tulip and the feathered elegance of a rosetta. The challenge lies in transitioning from the discrete pours of the tulip to the continuous wiggle of the rosetta without breaking the flow. Practice the transition by pouring a tulip base, then immediately lowering the pitcher and beginning the wiggle before the final layer sets. This requires a fast, fluid motion that comes with repetition.
Equipment Adjustments for Advanced Home Baristas
Your equipment does not need to be expensive, but it must be optimized. For advanced latte art, consider these adjustments:
- Pitcher spout shape: A sharp, pointed spout (like the Motta or Rattleware) offers better control for fine lines. A rounded spout is harder to control for cut-throughs.
- Cup shape: Use a cup with a 60-degree angled side wall. This helps milk flow upward and stack layers. Flat-bottomed cups are more forgiving but produce less dramatic height.
- Steam wand tip: A single-hole tip produces larger bubbles that are harder to integrate. A two- or three-hole tip creates finer microfoam more consistently. If your machine has a single-hole tip, consider upgrading to a multi-hole tip.
Also consider the temperature of your milk. For advanced pours, milk should be between 55 and 60 degrees Celsius. Too cold and the microfoam will not hold shape. Too hot and the proteins break down, causing the milk to become watery. Use a thermometer until you can reliably judge temperature by feel.
Practice Drills for Pattern Consistency
Consistency is the hallmark of an advanced home barista. Dedicate 10 minutes each day to the following drills:
- Water and dish soap drill: Fill a dark mug with water and a drop of dish soap. Practice pouring the tulip and rosetta patterns using water. The soap creates a surface tension that mimics crema, and the water behaves similarly to milk. This allows unlimited practice without wasting coffee or milk.
- Steady stream drill: Fill your pitcher with water and practice pouring a single, uninterrupted stream into a cup from varying heights. The goal is to pour without splashing or breaking the stream. This builds muscle memory for the cut-through motion.
- Wiggle frequency drill: Use a metronome app set to 120 BPM. Wiggle the pitcher in time with the beat while pouring water. This trains a consistent wiggle frequency, which is critical for symmetrical rosettas.
Record your pours on video and review them in slow motion. Look for moments where the flow breaks, the pitcher tilts too far, or the wiggle becomes erratic. Compare your video to professional tutorials to identify specific areas for improvement. This kind of deliberate practice yields faster progress than random repetition.
Final Thoughts on Mastering Advanced Latte Art at Home
Mastering the advanced tulip and rosetta transforms your home coffee experience from routine to ritual. These techniques require patience, consistent milk texture, and a willingness to fail in front of a camera. But the moment you pour a clean, layered tulip with a sharp cut-through or a symmetrical rosetta with feathering, the effort becomes worth it. Focus on one pattern at a time, use the drills above to build muscle memory, and adjust your equipment for precision. With daily practice and attention to detail, you can produce latte art at home that rivals your favorite cafe. The journey from basic heart to advanced rosetta is a rewarding one, and every imperfect pour teaches you something about flow, control, and the science of coffee.