Home Coffee Cupping: SCA Sensory Evaluation Protocol
Imagine being able to taste your morning coffee with the precision of a professional Q Grader. You don’t need a lab coat or a fancy certification to unlock the full flavor story in your cup. The Specialty Coffee Association (SCA) cupping protocol is the gold standard for evaluating coffee, and with a few simple tools and a systematic approach, you can replicate this sensory evaluation right in your own kitchen. This guide walks you through the SCA cupping protocol for home coffee sensory evaluation, helping you identify flavor notes, assess quality, and deepen your appreciation for every bean you brew.
Why Cupping Beats Brewing for Sensory Analysis
Traditional brewing methods like pour over or French press introduce variables that can mask or distort a coffee’s true character. Grind size, water temperature, brew time, and even the filter material all influence the final flavor. Cupping strips away these variables by using a standardized, immersion based extraction. Every coffee is ground to the same consistency, steeped for the same duration, and evaluated at the same temperature intervals. This consistency allows you to compare coffees side by side with minimal interference.
For the home enthusiast, cupping offers a direct line to the coffee’s intrinsic qualities: its acidity, sweetness, body, and flavor profile. It is the same method used by coffee buyers, roasters, and baristas to make purchasing and roasting decisions. By learning the SCA cupping protocol for home coffee sensory evaluation, you gain the ability to detect defects, appreciate subtle notes, and track how a coffee changes as it ages or as you adjust your roast profile. In our guide on building a home coffee cupping kit with organic beans, we explain the essential gear to get started.
Essential Tools for Home Cupping
You do not need a professional lab setup, but a few specific items will make your evaluation accurate and repeatable. The SCA cupping protocol relies on standardized equipment to eliminate variables.
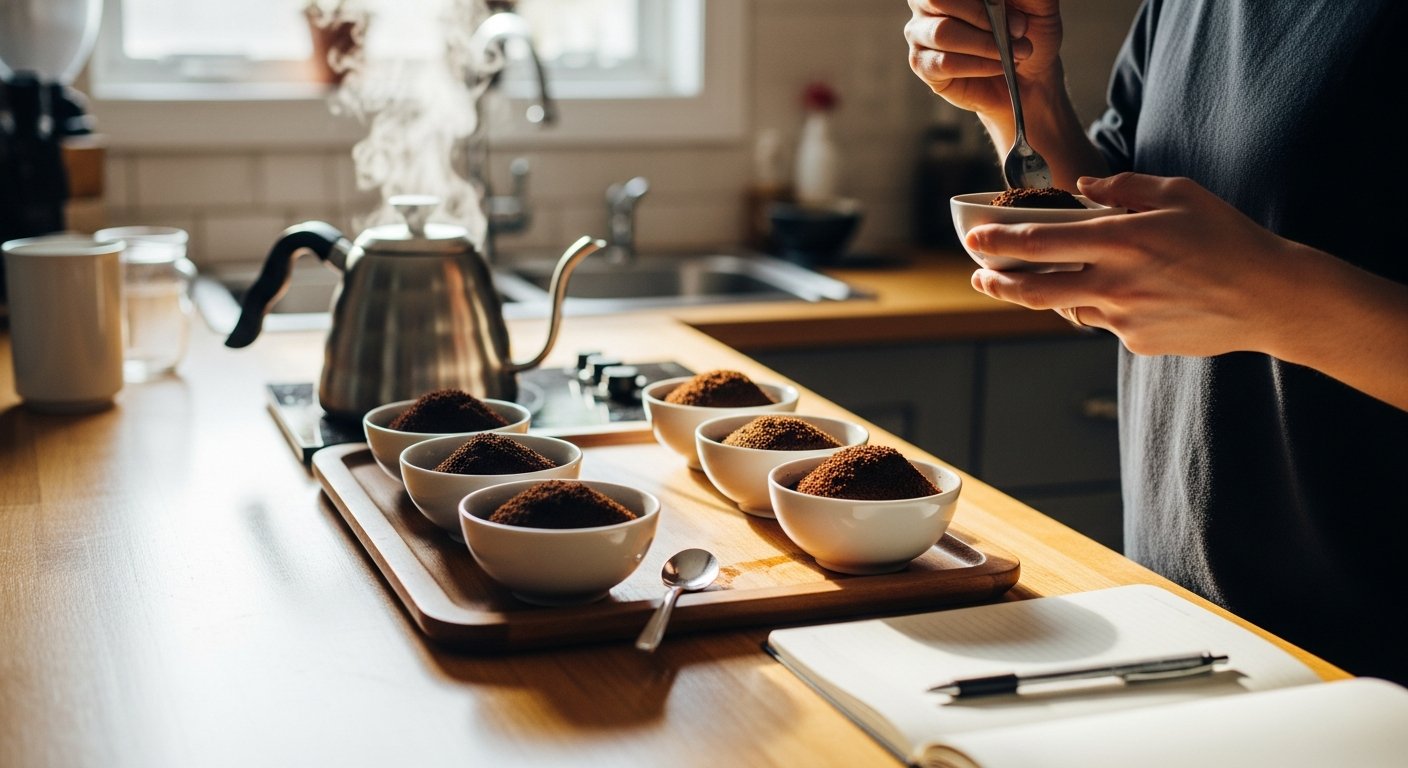
- Cupping bowls or glasses: Use identical, heat resistant glass or ceramic vessels. Standard SCA bowls hold 200-250 ml. Thick, uniform walls help maintain temperature consistency between samples.
- Fresh water: Use clean, filtered water with a total dissolved solids (TDS) level between 125-175 ppm. Avoid distilled or heavily mineralized water.
- Grinder: A burr grinder is essential for achieving a consistent coarse grind (similar to sea salt). Blade grinders produce uneven particles that lead to uneven extraction.
- Scale and timer: Precision matters. Measure coffee (8.25 grams per 150 ml water) and water (92-96°C) accurately. A timer helps you track the four minute steep and subsequent breaks.
- Spoons: Use deep, round cupping spoons (usually 5-6 ml capacity). If you do not have cupping spoons, a clean, non reactive soupspoon works as a substitute.
- Spit cup: A large cup for expelling coffee after tasting. Professional cuppers swallow small amounts but rarely consume full samples.
- Evaluation form: Print or use a digital SCA cupping form to score attributes like fragrance/aroma, flavor, aftertaste, acidity, body, balance, uniformity, clean cup, sweetness, and overall impression.
Setting up a dedicated tasting station with good lighting (preferably north facing daylight or a neutral LED) and a clean palate (no strong foods or perfumes) will further improve your accuracy. Avoid tasting when you are tired, stressed, or have recently eaten spicy or sweet foods.
Step by Step: The SCA Cupping Protocol
Preparation and Grinding
Begin by heating your water to 93°C (200°F). While the water heats, weigh out 8.25 grams of coffee per sample. Grind each coffee to a coarse setting (comparable to sea salt or raw sugar) immediately before brewing. Grind all samples in the same order you will evaluate them to minimize oxidation differences. Place the ground coffee into the cupping bowl and gently shake to level the bed. Smell the dry grounds and note the fragrance on your evaluation form.
Pouring and Steeping
Pour 150 ml of hot water directly onto the grounds, starting a timer as you pour. Ensure all grounds are fully saturated. Do not stir. After pouring, let the coffee steep undisturbed for exactly four minutes. During this time, a crust of coffee grounds will form on the surface. Smell the emerging aromas as the crust develops and record any initial impressions.
Breaking the Crust
After four minutes, take your cupping spoon and gently break the crust by pushing it away from you, then back toward you. Lean in and inhale deeply as you break the crust. This is the most aromatic moment of the cupping process. Note the intensity and character of the aroma. Then, skim off the floating grounds and any foam from the surface using two spoons. Discard the skimmed material.
Tasting and Evaluation
Allow the coffee to cool for two to three minutes before tasting. Use your spoon to slurp the coffee vigorously from the surface. Slurping aerates the coffee across your entire palate, allowing you to perceive sweetness, acidity, and bitterness simultaneously. Evaluate each attribute in order: flavor, aftertaste, acidity, body, and balance. Re taste the coffee as it cools to 70°C (160°F) and again at room temperature (around 25°C or 77°F). Many flavors become more apparent as the coffee cools. Score each attribute from 0 to 10 on the SCA form, with 6 being the baseline for a good specialty coffee.
Mastering the Sensory Attributes
The SCA cupping protocol home coffee sensory evaluation revolves around ten core attributes. Understanding each one will sharpen your palate and help you articulate what you taste.
- Fragrance/Aroma: The smell of the dry grounds (fragrance) and the wet coffee after pouring (aroma). Look for floral, fruity, nutty, or chocolate notes.
- Flavor: The overall taste impression, including the intensity, quality, and complexity of the coffee.
- Aftertaste: The lingering flavor that remains after swallowing. A pleasant, lasting aftertaste is desirable.
- Acidity: Often described as brightness or liveliness. Not sourness, but a crisp, wine like quality. Evaluate its intensity and quality.
- Body: The weight or mouthfeel of the coffee. Can range from light and tea like to heavy and syrupy.
- Balance: How well the acidity, sweetness, and body complement each other. A balanced coffee is harmonious.
- Uniformity: Consistency across multiple sips. Deduct points if you detect uneven extraction or defects.
- Clean Cup: The absence of off flavors or taints. A clean cup is free from defects.
- Sweetness: The perception of sugar like sweetness. A fundamental component of high quality coffee.
- Overall: Your holistic impression of the coffee, factoring in all other attributes.
When scoring, be honest and resist the urge to inflate scores for expensive or rare coffees. The goal is to calibrate your palate, not to justify a purchase. Over time, you will develop a mental library of reference flavors that makes each cupping session more insightful.
Common Mistakes and How to Avoid Them
Even experienced cuppers fall into traps that skew results. Here are the most frequent pitfalls in home coffee sensory evaluation and how to sidestep them.
Using stale or poorly stored coffee. Coffee begins to oxidize immediately after roasting. Use beans roasted within 2 to 14 days for best results. Store them in an airtight container away from light, heat, and moisture. Avoid refrigerating or freezing beans you plan to cup within a week.
Inconsistent grind size. A mix of fine and coarse particles extracts unevenly, creating muddled flavors. Calibrate your grinder before each session and discard the first few grams of grind to clear the burrs.
Not cleaning your palate between samples. Rinse your spoon in hot water and take a sip of plain water between coffees. Avoid eating crackers or bread, as they can leave starches that alter perception.
Rushing the cooling process. Many flavors only emerge as the coffee drops below 70°C (160°F). Be patient and taste at multiple temperature points. A coffee that tastes bitter hot may reveal hidden sweetness when cool.
Ignoring the spit cup. Swallowing multiple samples can dull your palate and introduce caffeine jitters. Spit after evaluating each sip to maintain sensitivity across a flight of coffees.
Applying Your Results
Once you have scored your coffees, what do you do with the data? The SCA cupping protocol home coffee sensory evaluation is not just a scorecard; it is a tool for improvement. If you roast your own beans, use the scores to refine your roast profile. A coffee that scores low on sweetness may benefit from a slightly longer development time. If you buy coffee, use your cupping notes to communicate with roasters or retailers about your preferences. You can even host cupping sessions with friends to compare different origins, processing methods, or roast levels.
Tracking your scores over time also reveals how a coffee evolves. A washed Ethiopian coffee may taste vibrant and floral on day 5, then mellow into tea like notes by day 14. This knowledge helps you decide when to brew a particular coffee for peak flavor. Over time, you will develop a personal flavor map that makes buying and brewing decisions more intentional and rewarding.
Cupping at home transforms coffee from a routine beverage into a sensory exploration. By following the SCA cupping protocol for home coffee sensory evaluation, you join a global community of professionals and enthusiasts who use the same method to pursue excellence. Your kitchen becomes a laboratory. Your palate becomes the instrument. And every cup becomes an opportunity to learn something new.